OPplus G/L Open Entries
This chapter describes how to set up and use the G/L Open Entries module (G/L Open Entries menu group).
You can use this module to create open entries for G/L accounts in the same way it is possible for customers and vendors. This can be especially useful when using or carrying costs such as Money Transfer, Transit Entries or Social Insurance Payables. accounts.
Note
This article describes version 15.00 of OPplus.
G/L Open Entries Setup
You use the G/L Open Entries Setup page to set up the OPplus G/L Open Entries module and you must fill in this page for every company you hold in Microsoft Dynamics™ Business Central. This section describes the tabs and fields on the G/L Open Entries Setup page.
To open the G/L Open Entries Setup page:
Select Other Setups > G/L Open Entries Setup.

On the Setup - General tab, enter information for the following fields:

Field Description Create Open Entries Here you can set up the system to create open entries for already existing entries if you have specified a G/L account to build open entries. The options are:
Blank - If you select the blank option, only new entries will be set to Open. In order to activate the creation of open entries, it is required that the G/L account’s balance equals zero.
All Entries - If you select the All Entries option, only the existing entries of the G/L account will be set to Open if the G/L account’s balance is unequal zero.Coloured Report-Hyperlinks Activate this field if you want to show the hyperlink to the respective G/L account in the „G/L Account – Open Entries“ report in blue color. If you do not use the color, it is still possible to open the G/L account card by clicking on the account number. Appln. between Currencies Here you can either select the „None“ or „All“ option. If you select „None“, all entries within one application must be in the same currency, otherwise different currencies would be allowed. Open Item Acc. vs. Open Item Acc. not allowed If you activate this field, you may not use two G/L open accounts for application. Otherwise, you will receive the following error message: 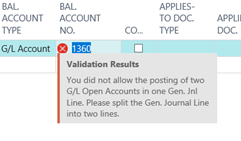
On the Setup - Source Code tab, we recommended to keep the default values for the following transactions:
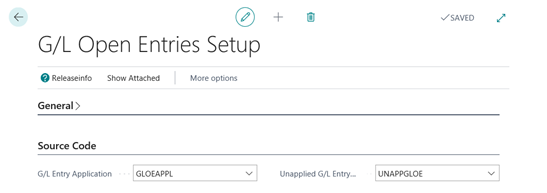
G/L Entry Application (set to GLOEAPPL by default)
Unapplied G/L Entry Appln. (set to UNAPPGLOE by default)
G/L Account Card
With the G/L Open Entries module, the new OPplus function button is available on the G/L account card:
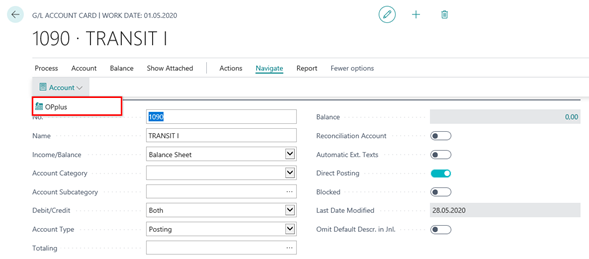
To access the OPplus G/L Account Card:
- Select Navigate > Account > OPplus
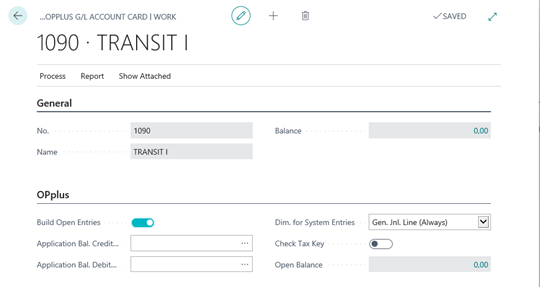
Build Open Entries check box (activate)
If you activate the Build Open Entries check box on the G/L Account Card, a dialog box appears asking you whether you want to enable the creation of open entries for the G/L account:

If you click Yes, the system will check the setting of the Create Open Entries field in the G/L Open Entries Setup as well as the current balance of the relevant G/L account. Depending on the values of these two fields, you can get different results which you’ll find in the following four scenarios:
| Scenario | Result |
|---|---|
| Open Entries Setup > Create Open Entries field = Blank G/L account balance equals zero | The Build Open Entries check box can be activated for the G/L account. Only new G/L entries will be set to Open. |
| G/L Open Entries Setup > Create Open Entries field = Blank G/L account is not zero. | The Build Open Entries check box cannot be activated due to the existing G/L account balance. The following message appears.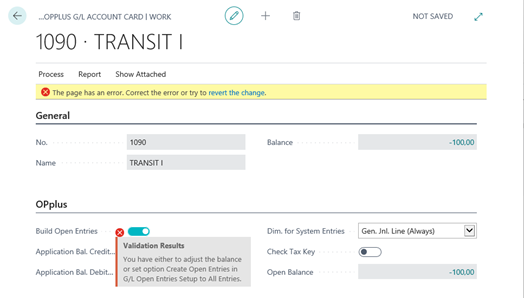 If you do not want to change the G/L Open Entries Setup, perform the following steps to create open entries for a G/L account: |
| G/L Open Entries Setup > Create Open Entries field = All Entries G/L account balance equals zero | The Build Open Entries check box can be activated. Since the G/L account’s balance equals zero, only new G/L entries will be set to Open. |
| G/L Open Entries Setup > Create Open Entries field = All Entries G/L account balance is not zero. | The Build Open Entries check box can be activated. Due to the existing balance, all entries would be set to “Open”. The following message appears For safety reasons, another message will appear:  If you click Yes, all entries of the G/L account will be set to Open. If the G/L Open Entries account is a G/L account, which is posted indirectly via a bank account, the assigned bank G/L account and/or the bank transit G/L account will be considered for the application of entries. |
Build Open Entries check box (deactivate)
If the Build Open Entries option on the G/L account card is activated and you want to deactivate it, the following dialog box appears asking you if you want to deactivate the creation of open entries (here shown for G/L account no. 1590):
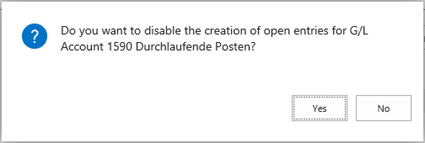
If you click „Yes“, the system will check if the remaining amount of all entries equals zero. Only if this is true, the check box will be deactivated.
- Remaining amount equals zero in all entries → The check box will be deactivated.
- Remaining amount does not equal zero at least in one of the entries → The following error message appears:
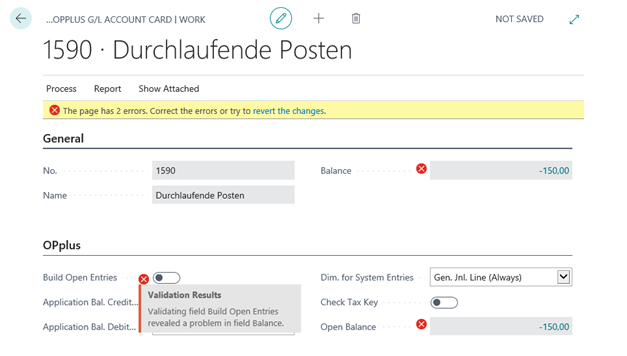
Application Bal. Credit Account | Application Bal. Debit Account
These fields are used if you have an application balance for a G/L open account and you want to leave the Ext. Application. If no account is specified here, the G/L account number of the original journal line will be entered into the second line as usual.
Dimension for System Posting
The following options are available in this field:

If a system posting takes place (e. g. exchange rate adjustment), you can specify the dimensions to use in the corresponding account.
If you select „Gen. Jnl. Line (Always)“, the original dimension will be used.
If you select „G/L account (Always)“, the default dimensions of the G/L account will be used.
If you select „G/L Account (if empty Gen. Jnl. Line)“, the dimensions of the G/L account will be used if there is no dimension value in the journal line.
Warning
This field belongs to the Payment Import module. So it can only be used if this module is licensed.
Open Balance
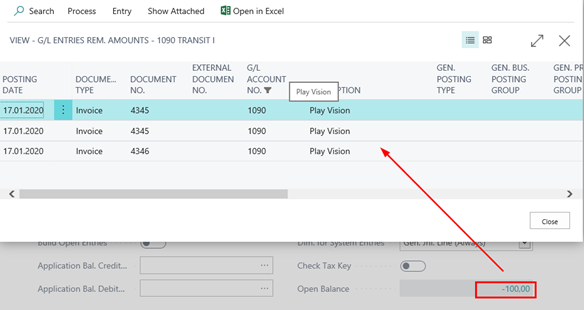
The OPplus tab has a separate „Open Balance“ field, which always behaves the same in each version – independent of the Standard application. By clicking the field, you can open the “G/L Entries Rem. Amounts” page.
Entries incl. Rem. Amount
With the G/L Open Entries module, the new menu item called „Entries incl. Rem. Amount“ is available via the Process button on the OPplus G/L Account Card.

By selecting the „Entries incl. Rem. Amount“ menu item, you can open the „G/L Entries Rem. Amounts” page which, in comparison to the “General Ledger Entries” page, consists of five additional columns:

Remaining Amount: This field shows the remaining amount which must be applied before the entry itself is completely applied. The remaining amount is automatically calculated during posting and is updated each time you perform application. As is the case for customer/vendor ledger entries, the Remaining Amount field is a FlowField that leads to the newly created Detailed Gen. Ledg. Entries:


Open: This field shows if the entry amount is completely paid or if there is a remaining amount to be applied. If this field is activated, it indicates that the entry has not yet been completely applied.
Closed by Entry No., Closed at Date, Closed by Amount: These fields indicate the entry and the amount which were used to completely apply a specific entry (and to close it).
Apply Entries
On the „G/L Entries Rem. Amounts“ page, you can open the application page by selecting Process -> Apply Entries which resembles the application page of Microsoft Dynamics™ Business Central -Standard.
The application of open G/L entries is performed the same way it is done for person accounts. In addition, you can use this page to open the Detailed Gen. Ledg. Entries page.
Please note the following if the OPplus Payment Import module is used: If the application method of the Ext. Gen. Journal Template is set to „Extended“, the entry application is performed on the „Easy Match“ and „Extended Application“ pages. Otherwise, it is performed on an application page which resembles the application of standard Microsoft Dynamics™ Business Central.
Application of Open Entries on a G/L Open Entries Account and Customer or Vendor Entries within one Posting
If you want to apply a G/L entry and a customer or vendor ledger entry during posting, you must enter separate lines in the Gen. Journal Line.
If you enter the posting in one line (by filling in the Account No. and Bal. Account No. fields), only the customer or vendor ledger entry will be applied.
This is due to the program logic specifying that within a one-line posting the application of a customer or vendor ledger entry takes precedence.
In this case, you need to perform the application on the G/L Open Entries account subsequently.
Detailed Entries
From the „G/L Entries Rem. Amounts“ page, you can reach the related detailed G/L entries via Entry -> Detailed Entries, or by clicking on the Remaining Amount field.
Open G/L Accounts
To open G/L Accounts:
In the OPplus menu, select G/L Open Entries > Open G/L Accounts

A page opens showing in the upper part the accounts that are set to „Build Open Entries“ = Yes. In the lower part, you will find the respective G/L account entries.
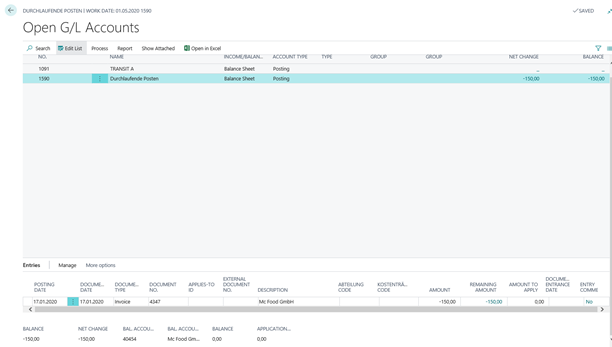
Select Manage > Edit List, to open the page in an editable mode. On this page, you can now directly set applications for individual entries. You’ll find the respective function via Manage -> Set Applies-to ID.

The system will automatically fill the „Applies-to ID“ and „Amount to Apply“ fields.

Selecting Manage > Post Application.
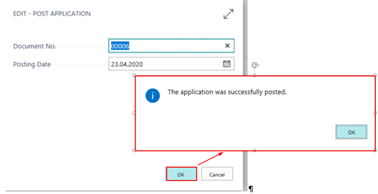
Furthermore, the „Apply Partial Payment“ function is integrated here.

You can enter the application balance into the Amount to Apply field of the current entry and post the application. If the current entry doesn’t have an Applies-to ID, it will be set automatically.
Open G/L Entries from Interim Postings
OPplus includes a report to automatically apply open G/L entries resulting from interim postings. If you activated the Expected Cost Posting to G/L field on the Inventory Setup page in Business Central, you can use this report to apply the postings on these interim accounts, provided they use G/L open entries.
You’ll find the menu item here:

A request page opens where you have to filter on the respective open G/L account you want to analyze. Moreover, you can specify the posting date for the automatic application.
In the report, you can select which cases you want to analyze.
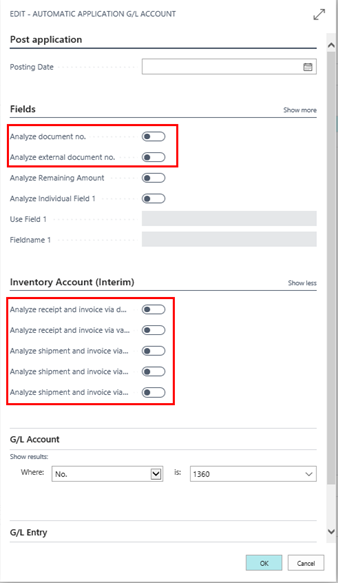
Furthermore, individual customer specific fields can be used for the analysis. You can select up to three fields you want to analyze:
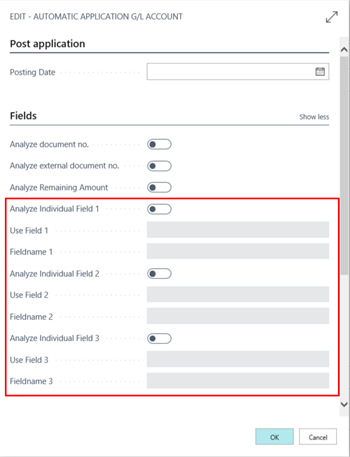
If the user activates the analysis of an individual field, the respective field must be selected. If no field is selected, an error message appears:

G/L Account – Open Entries
To print open G/L Entries or export them to Excel:
From the main menu, select G/L Open Entries > G/L Account > Open Entries.
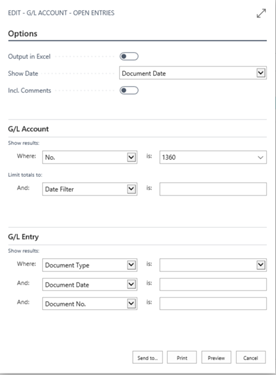
Use the Options tab to activate the Output to Excel field if you want to export the report contents to Excel. Moreover, you can select whether you want to show the Posting Date or the Document Date.
Use the G/L Account tab to indicate the G/L accounts you want to consider in the report. In addition, a date filter must be specified. If this report is opened e. g. by using a To Date filter, the Open Entries List will be printed based on an effective date (e. g. date filter ..31.12.2019 => all open G/L entries due as of 31.12.2019).
Use the G/L Entry tab to indicate the G/L entries to be included in the report. If you want to export the report without printing it, you must at least open the report by selecting Preview.
Use of Hyperlinks in Reports
To use hyperlinks in reports:
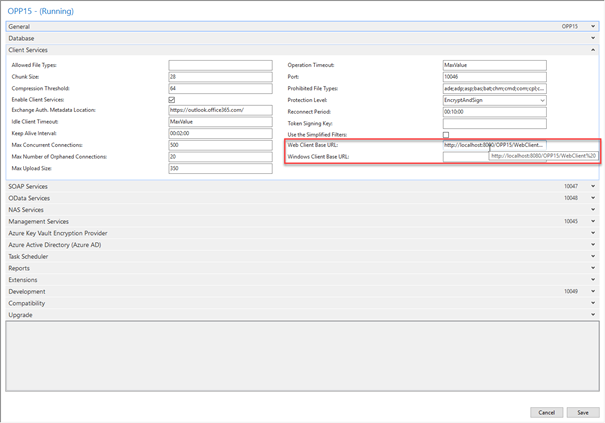
Ask your system administrator to modify the configuration file respectively so that the internal function “GETURL” creates the correct link. The following key has to be added (XYZ acts as a place holder):
<add key=„PublicWebBaseUrl“ value=„XYZ“/>
For further information refer to Microsoft's Creating URLS to Microsoft Dynamics NAV clients
Using the G/L Open Entries and Extended Lists & Reports modules
If you use both the G/L Open Entries and the Extended Lists and Reports modules, the Entry Comment field will also be available in the G/L Entries Rem. Amounts table.
For more details, please refer to chapter „Ledger Entry Comments“ of the „Ext. Lists and Reports” manual.
Using the G/L Open Entries and Payment Export modules
Create a G/L Account Proposal
In combination with the G/L Open Entries module, you can now use a function to create a G/L Account Proposal in the Payment Proposals.
For further information, please refer to the Payment Export manual.
Using the G/L Open Entries and Payment Import modules
In combination with the G/L Open Entries module, you can now also use the Ext. Cash Receipt Journal to apply open G/L entries. If auto accounting rules exist for the account and if the amounts are the same, OPplus automatically applies the amount.
For further information, please refer to the Payment Import manual.
Warning
For performance reasons, an automatic application via the amount only takes place if there are not more than 500 open entries on the respective G/L account. This restriction does not apply to the application via other application criteria.